In the Name of Allah The Most Gracious and Most Merciful

بسم الله الرحمن الرحيم
السلام عليكم و رحمة الله و بركاته


Monday, June 17, 2013

Flower Pot Card

بسم الله الرحمن الرحيم
السلام عليكم و رحمة الله و بركاته

Dear All

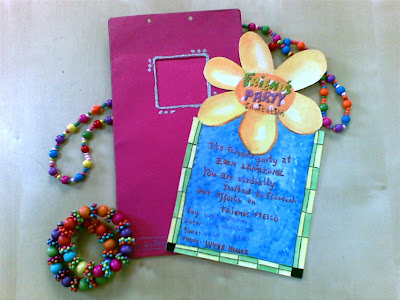
check this one ... just made for my lovely Friend, will show you the tutorial soon innshaAllah


happy watching

Shirt Card

بسم الله الرحمن الرحيم
السلام عليكم و رحمة الله و بركاته

Dear Friends and Sisters
See some of my new style Cards


happy day!

3D Card

بسم الله الرحمن الرحيم
السلام عليكم و رحمة الله و بركاته

Dear Sisters and Friends
Few Cards pictures which i made few months back, soon will be sharing the tutorials InnshaAllah


happy cardmaking

Friday, October 14, 2011

An Invitation Card

بسم الله الرحمن الرحيم
السلام عليكم ورحمة الله وبركاته

Dear Friends,
Recently Im doing Just Nothing these days,with Cardmaking stuff, im quite Busy,
but leaving you what i did some time ago, in May 2011,
I just made this Invitation Card for Our Party At our institute for our Teachers,
Easy And Simple Card, Using Quilling Technique. Thats it!


==============================
Thanks for Stopping by
Happy Cardmaking
==============================

Monday, March 28, 2011

Some more Recent cards

بسم الله الرحمن الرحيم
السلام عليكم ورحمة الله وبركاته

Dear all,
These are Some more recent cards,, inn sha allah ill be uploading the step by step tutorial soon, this week or later inn sha allah,,
quite busy right now, sorry for inconvenience.


This card is not my recent card. I made this long ago, about 7 years back, as a Friends Party Invitation Card at College Residence 2004
Innsha Allah will soon upload the instructions.
thanks for visiting


Thanks
be happy and a happy cardmaking

Sunday, August 1, 2010

Card no:30 - Easy Cards For Ramadhan


بسم الله الرحمن الرحيم

السلام عليكم و رحمة الله و بركاته

Dear Everyone
This is a simple and an easy card I made for my friends for Ramadhan
You will be needing some cardstock, in different colors, like brown and cream etc
Scissors, glue, flower of your choice, any floral stamp and brown ink and pen, that’s all.


Card Instructions

Step 1:


*Using your trimmer and glue or glue glider, make some 4 to 5 cards handy by pasting coffee color cardstock to cream ready Basic Cards (Landscape cards are 5-1/2″ x 4-1/4″)

Note: One-quarter of an A4 sheet of card stock is also considered a standard card size.


Step 2:

*Using your brown ink (mine is Colorbox Chestnut Brown) just dab with the sponge at the sides of the card.

Step 3:

*Just cut two cardstock pieces, brown and cream and rough the sides of the cream cardstock with the scissors. See below.


Its easy, just rub the cutting side of the scissors, to the card edge, it will give the rough look like this one and paste them.

Step 4:

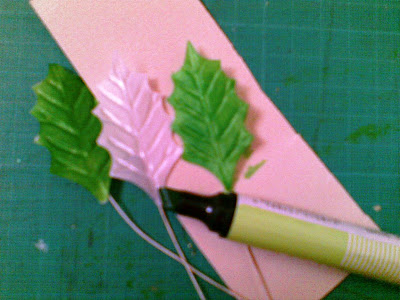
Make a flower with a rubber mat or plastic mat (left over) or you can use any flower of your own choice.


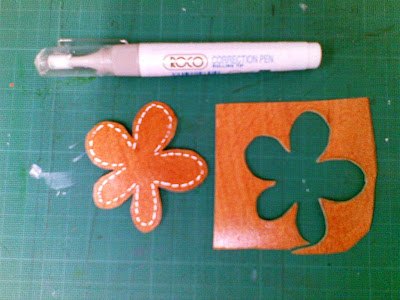
And make some stitch line at the sides of the flower.

Attach the flower to the card using glue, and put a button on the center of the flower.

Step 5:
Write some Card wordings on the cream card, which is on the top, with a brown pen.


Step 6:

Finally make some small frames by cutting some brown stock, in a square, then cut it into diagonal, and trimming the outer side abt ¼ inch. See below.


Attach them to the corners of the card at opposite directions.

And here you go, Your Card is Ready.

===========================================

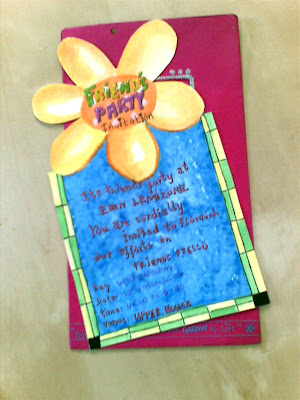
The other card I also made with the same combinations,

See:


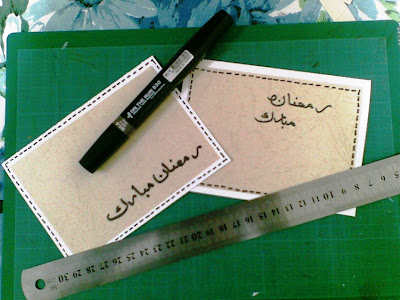
Write some card wordings and make stitching lines at the sides.


Using your stamps, (I use my own handmade stamp) stamp twice on the card with one turn of the ink pad so that you will get the light and dark shade of the ink, I hope you get it. See below.

Finally put some glitter or dust on the stamp flowers. That’s all!


Finished look.


====================================
Happy Cardmaking!

Thanks everyone..
====================================

Some of my Recent Cards


بسم الله الرحمن الرحيم
السلام عليكم
Dear Everyone
These are few more Cards i made recently, and I will sure leave the tutorial soon, hmm, just leaving some of its pictures, but will come back soon with all the details of each card innshallah
Thanks for visiting.
=========================================


==========================
Thanks for visiting
Be happy
Happy crafting cards
==========================

Saturday, June 12, 2010

Card no:29 - Another Special Bouquet Card.

بسم الله الرحمن الرحيم
السلام عليكم و رحمة الله و بركاته
Hello Everyone!
This is Another Special Bouquet Card
For Our Another Arabic Teacher
On behalf of All the Students,
It is also a Thank you Card,
For Details check the step by step Instructions.
Thank you!


Tutorial
Dear friends,
The tutorial is almost the same as in my previous post,
A Flower Bouquet Card (Card no.28)
only few things i have changed and used instead of other things, and the new thing about this card is i made two of the red roses myself (through quilling technique) and i have explained that through pictures below, so follow the instructions, and here you go!

*smiles*

Step 1
I crumbled the light brown paper, and opened and pressed with iron, to give it a distressed messy look.

Step 2
I tear it with the help of a steel ruler to the size i wanted on the card.


Step 3
Then Adhere the paper to the card using Roller tape (its the best) or you can use any glue stick.


Step 4
Then I made the Flower bouquet the same way i did before in (Flower Bouquet Card)
but this time i used some Handmade Red Roses and some ready made Peach Roses
See the instructions how i made the Red Roses below.

I Colour the Plain white silky leaves to Green leaves.


And Here is my Flower Bouquet which is ready to use on Card.


Step 5
I collected some mesh, in Red and Peach Colour and some Tieing stuff (its not a thread nor a ribbon, you can called it a string but its not that even *smiles*) you may have seen it on a cake or bakery boxes, which is wrapped/closed through this sort of a ribbon/string.


I neatly tie a Bow of that string, and attached the peach mesh with the school glue at the bottom.


I put the Red Mesh square under the Bouquet Diagonally, and added some dry stems into the bouquet and made the tag finally.
Click the Picture for Larger view
That's all!
======================================================

How to make Quilled Roses.
Materials You'll be needing are:
  1. Thin Red Strip of paper ( I took 3/4 " x 12" long strip approx)
  2. Quilling Tool or a Wooden tooth pick (you can use that too)
  3. Tissue Dotted Ribbon (Any thick width wise Ribbon)
  4. A Coloured Wire ( I used Green Wire)
  5. Green Crepe Paper or Tissue Paper or Kite Paper (use some thin stuff)
Method:
Quilling Roses are easy to make,
use a Quiling tool or a wooden tooth pick (it works, I have done with that too)

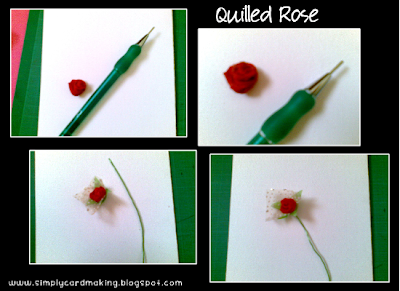
Start rolling your red strip of paper, (if you are using a tooth pick, then do glue the strip at the very beginning, roll once and stick it there,using glue, then continue rolling, so it will not fall or come out)

So Start rolling the paper, make some spirals (swirls) then turn your strip at a 90 degree right angle, downwards, and keep rolling with that turning, (don't worry if it goes messy) turn again and again at 90 degrees downwards every time and keep rolling your tool, until you finish your strip.
Now just make it loose and glue the end of the Strip to the rose.

Diagram showing how to Roll and turn your strip.

1 2 3 4

=========================

For more Clear Directions of Quilled Rose,
CLICK HERE.

A Video Tutorial of a Quilled Rose (from where i have learned)
CLICK HERE
Extras: For More different Rose Flower Tutorial CLICK HERE

I hope it will help you all.
===========================


After i made the roses, I cut the dotted tissue ribbon in square and the green kite paper in Star shape and attached them together to the rose, at the bottom and then wired the Rose.


This is the Ready bouquet which i used on the Card.


=================================
That's all Folks!
Happy Bouquet making!
Be happy always!

=================================
For Enlarge View Click the Picture
Thank you!

=================================

Related Posts with Thumbnails