==============================
بسم الله الرحمن الرحيم
السلام عليكم و رحمة الله و بركاته


بسم الله الرحمن الرحيم
السلام عليكم و رحمة الله و بركاته
Hello Everyone!
This is Another Special Bouquet Card
For Our Another Arabic Teacher
On behalf of All the Students,
It is also a Thank you Card,
For Details check the step by step Instructions.
Thank you!
Tutorial
Dear friends,
The tutorial is almost the same as in my previous post, A Flower Bouquet Card (Card no.28)
only few things i have changed and used instead of other things, and the new thing about this card is i made two of the red roses myself (through quilling technique) and i have explained that through pictures below, so follow the instructions, and here you go!
*smiles*
Step 1
I crumbled the light brown paper, and opened and pressed with iron, to give it a distressed messy look.
Step 2
I tear it with the help of a steel ruler to the size i wanted on the card.
.jpg)
.jpg)
.jpg)
.jpg)
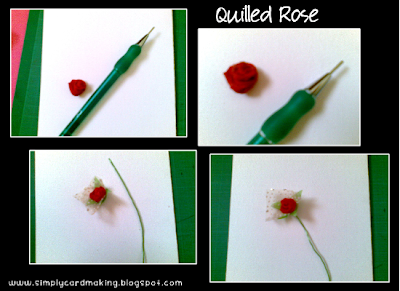
Start rolling your red strip of paper, (if you are using a tooth pick, then do glue the strip at the very beginning, roll once and stick it there,using glue, then continue rolling, so it will not fall or come out)
So Start rolling the paper, make some spirals (swirls) then turn your strip at a 90 degree right angle, downwards, and keep rolling with that turning, (don't worry if it goes messy) turn again and again at 90 degrees downwards every time and keep rolling your tool, until you finish your strip.
Now just make it loose and glue the end of the Strip to the rose.
Diagram showing how to Roll and turn your strip.
1 2 3 4
=========================
For more Clear Directions of Quilled Rose, CLICK HERE.
A Video Tutorial of a Quilled Rose (from where i have learned)
CLICK HERE
Extras: For More different Rose Flower Tutorial CLICK HERE
I hope it will help you all.
===========================

.jpg)
بسم الله الرحمن الرحيم
السلام عليكم و رحمة الله و بركاته
Dear sisters, friends and Everyone!
This is a Special Card where i used some flowers and leaves and made a bouquet from them,
it was made for Our Arabic Class Teacher,
A Thank you Card,
on behalf of all the Students.
Its an easy Card, and it Turns out so beautiful.
I hope you all like it.
Check the Instructions for Details.
I have uploaded step by step pictures as well,
i hope it will help to understand clearly.
Thanks for visiting!
.jpg)
.jpg)
.jpg)
.jpg)
.jpg)
.jpg)
.jpg)
I wanted to share a Sweet Card which is given to us by one of our Arabic teacher at the end of our Second Level of Arabic Classes, to all of her Students,
it was so nice of her,
She is so Creative and Talented (ماشاء الله)
And i Respect her a lot.
.jpg)
==================================
Thanks for visiting!
Be happy
Please do leave me comments on this post,
ill be so happy to read them all
thank you!
==================================
بسم الله الرحمن الرحيم
السلام عليكم و رحمة الله و بركاته
Hi Everyone!
===========================================
That’s all folks,
Happy cardmaking!
======================================================
Step 1.jpg)
Step 2.jpg)
Step 3.jpg)
Step 4, 5 and 6
.jpg)
Final Look with Embellishments.jpg)
===========================================
You may use any of my designs for your own personal use, but you may not use any designs for publication, contest submissions or to claim as your own design.